The Anatomy of Screens
Screens
You can have as many screens as you need, but most establishments use between two to five screens. The gray boxes at the bottom of the ordering screen represent your screens. By tapping these boxes, you can quickly move from one screen to another.
Items
The white boxes with images or colors are your items. Items can be placed anywhere on the screen and stay in that spot. Items can be placed on multiple screens and can also be placed in multiple groups.
Groups
The dark gray boxes are groups, which are a collection of items. Not to be confused with departments, groups are only used for screen layout. You can place up to 19 items in a group, but cannot place a group within a group.
Screen Layout Tips
Decide How Many Screens You Need
Some establishments use different screens for different times of day or special events. You can create a screen for lunch, another for dinner, and even one for Happy Hour or brunch. Remember, you can place the same item or group on multiple screens.
Group Similar Items Together
A good place to start is with your menu. Often it is already divided into sections so you can create a group for each section. If a group has more than 19 items, consider dividing it into smaller groups. For instance, Beers A-M and Beers N-Z.
Use Imagery To Differentiate Items and Groups
By importing photos for items or assigning colors to items and groups, you can help your staff differentiate items without much thought.
Use Modifiers For Up-Charges
There's no need to create specific items for additional charges. All this can be done on the Modifier screen.
To help you map out your screens, we've created this handy little worksheet to sketch out some ideas.
Placing Items
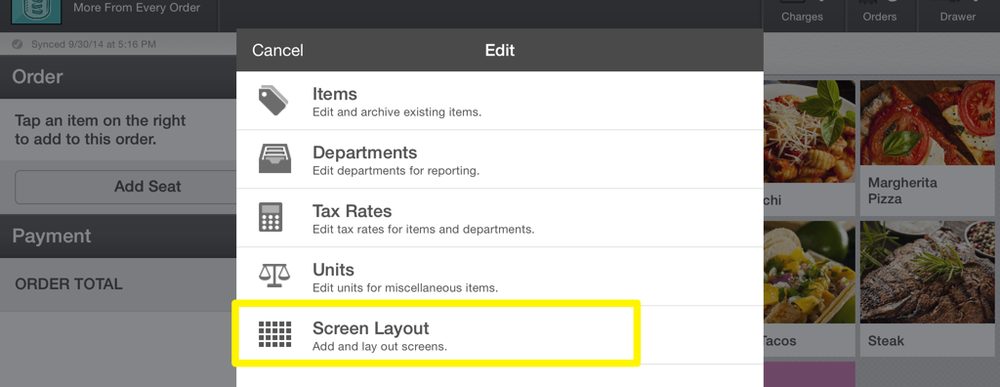
From the Account Dropdown in the Action Bar, select Edit then Screen Layout.
You are now looking at the layout of your first screen. There are two ways to place items on this screen:
1. Tap an item in the list on the left, then tap an open square on the right.
2. Tap an open square on the right, then tap an item in the list on the left.
When you have finished placing items, tap Exit.
Placing Multiple Items At Once
You can place multiple items at a time, by selecting more than one from the item list, then tap the square you would like to place the first item.
It will place the items on the screen in the order you selected them, from left to right. If you are placing your new items over existing ones, it will replace them and move the original items to your Item Tray.
The Item Tray is a temporary spot for holding the items and groups you are currently working with. It prevents you from having to constantly look through your item list when only moving around a few items.
Moving and Replacing Items
If you tap an item on a screen, the item will be moved to your Item Tray.
The Item Tray is a temporary spot for holding the items and groups you are currently working with. It prevents you from having to constantly look through your item list when only moving around a few items.
If you place an item on top of another, it will replace it and move the original item to your Item Tray.
From the Item Tray, you can select one or more items and place them elsewhere on the screen or other screens.
Removing Items
To remove an item from a screen, tap it to move it to the Item Tray. Then tap Remove.
If you have multiple items in your item tray and tap Remove. All those items will be removed at once.
Creating Groups
From the Account Dropdown in the Action Bar, select Edit then Screen Layout.
Switch over to the Groups tab in the left column. Tap Create Group, then you will be asked to enter a name for your new group. Tap Next.
Now select a color for this group. Tap Next.
The background color will change to dark gray with a white box in the left uppermost square. You are now editing the layout of your new group. Place items from the list on the left.
Once you are finished, tap Done to exit the group.
Editing Groups
From the Account Dropdown in the Action Bar, select Edit then Screen Layout.
You can edit groups two different ways:
1. Under the Groups tab, you can tap the gray grid next to the group you want to edit.
2. Tap a group on the screen. Then tap Edit in the popover.
The background color will change to dark gray with a white box in the left uppermost square. You are now editing the group and can place or move items.
From this screen, you can also change the name and color of the group by tapping Edit Group at the very top of the sidebar on the left.
Once you are finished editing, tap Done.
Placing Groups
From the Account Dropdown in the Action Bar, select Edit then Screen Layout.
Switch over to the Groups tab in the left column. Now there are two ways to place groups on screens:
1. Tap a group in the list on the left, then tap where you would like to place it on the right.
2. Tap a square on the right, then tap a group in the list on the left.
When you have finished placing groups, tap Exit.
Moving Groups
From the Account Dropdown in the Action Bar, select Edit then Screen Layout. Tap the group you want to move, then tap Move in the popover.
The item will be moved to your Item Tray, tap it again to select it. Then tap where you would like to place it. Tap Exit when you are finished.
Removing Groups
From the Account Dropdown in the Action Bar, select Edit then Screen Layout. Tap the group you want to move, then tap Move in the popover. The item will be moved to the Item Tray, tap Remove. When you are finished, tap Exit.
Deleting Groups
From the Account Dropdown in the Action Bar, select Edit then Screen Layout. In the left column, tap the Groups tab at the top of the screen to view your list of groups. Then tap the Grid Icon next to the group you want to delete.
Tap Edit Group at the top of the column on the left, then select Delete Group. Tap Delete, then Delete again in the popover.
Adding Screens
From the Account Dropdown in the Action Bar, select Edit then Screen Layout. At the bottom of the screen, tap the teal square with a plus sign.
In the popover, select which type of screen you would like to create:
Blank Screen - A new empty screen.
Recently Sold - Fills the screen with your most recently sold items.
Top Sellers - Fills the screen with your top selling items.
Duplicate Current - Duplicates the screen you are currently viewing.
Deleting Screens
From the Account Dropdown in the Action Bar, select Edit then Screen Layout. At the bottom of the screen, tap the screen you would like to delete. Now that you are viewing that screen, tap that square again then tap Delete in the popover.
You will be asked to confirm the deletion. Tap Delete again.
Overlapping Items and Groups
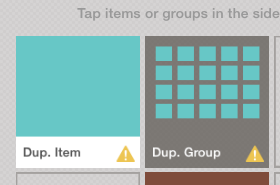
Every once in awhile if a syncing conflict occurs, items and groups sometimes end up stacked on top of other items or groups. When this happens, a yellow icon appears.
To correct this, you can tap the square to remove the stacked items. Then place the correct item back in its location.
Next Steps
Learn how to configure your Payment Settings.


